Monday, January 31, 2011

Day 30 - Big Birthday Candle

What a fun day! I got an email from a friend that suggested a blog for me to check out and that one led me to one after another. Finally I just had to stop, but oh, I saw some of the best blogs and projects galore. This has just made me want to stamp more and to dress my blog up with more pictures, so I'm going to start today and you can let me know what you think.

By the way, I had to go back and correct last night's blog title - I jumped ahead and made it Day 30, but it really was Day 29 and is now correct. I really wish I had started this on January 1, so my dates and days would have been the same, but now that we're heading into February it won't matter anyway!

Can you believe it tomorrow is February 1! Oh, my this year is already flying by and speaking of that I had the birthday of a special little "adopted" granddaughter sneak up on me. First of the month birthdays always seem to do that and so today I made my card really early so I could get it in the mail.

I used a very old and very retired stamp set for this card! I've kept a lot of my old sets and I still love them and feel like it's OK to use them. Many of you have old sets too and it's always nice to get them out - it's like visiting with an old friend. So here we go with today's card -

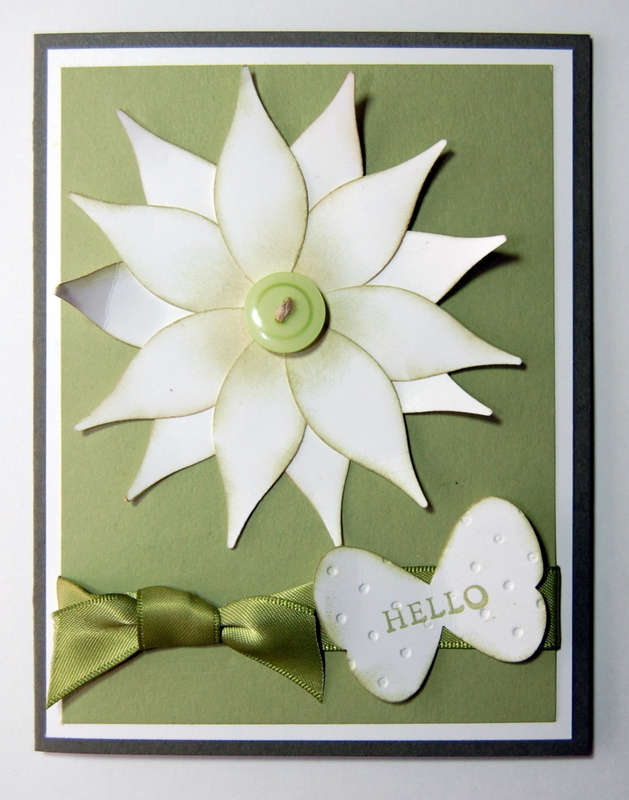
I used Pirouette Pink for the card base and Pretty in Pink for the first layer. I embossed this piece with Retro Circles an embossing folder (non SU). I added a third layer in Whisper White and I stamped the candle using markers so I could get the various colors. This is a two step stamp set for outlines and solids. I love the sentiment Make a Wish! I used a glitter pen to make the flame a little more exciting as you can see in the close up picture. If you would like exact dimensions or colors, please comment and I will see that you get them.

I had fun with the inside of the card too - I added a second piece of Pretty in Pink to stamp my sentiment and I used the Heart to Heart punch in the bottom left corner and then rather than waste the punched out hearts I used them on the inside left page. I always want to snap pictures of the insides, but I often have already added my note as I did today, but I'm going to show the pictures anyway, because I like the way it turned out.
The Happy Birthday is from the Big Birthday Candle set and the adorable sentiment is from It's Your Birthday, also retired.
I know I've used all retired stamp sets for this card, but you can still use the layout and the idea to use other sets or maybe you just happen to have these sets and will pull them out from the back and use them once again.
I just placed an order tonight, so I will be anxiously awaiting a new order from Stampin' Up!, including several SAB sets! So soon you will be seeing some brand new items along my old favorites.
If there's a set you would like for me to feature, let me know. If I have it I'll use it to create a card or project of some sort. Until tomorrow Happy Stamping -

Sunday, January 30, 2011

Day 29 Embedded Embossing with Fun Flowers

Good evening ladies,

I'm so excited to be posting so early tonight. I 've spent the better part of the afternoon organizing my DSP (designer series paper) from Stampin' Up! I've got enough to last me the rest of my life! And that's if I live to 100! Unfortunately, most of it is retired now, but you're going to be seeing it in various projects anyway - got to use it and you can always find a current paper similar to use in your projects. Maybe, just maybe you too have some paper stuck away and might be inspired to use yours too! Anyway, I had fun looking at all of the goodies, made a list of card stock and markers I need to order and played with some punches and dies.

Then I settled down and made a birthday card using a new technique. I learned about this technique from Gretchen Barron, a fabulously creative stamper. I follow her blog and I just loved this idea. You can see her creations at her blog: http://gretchenbarron.typepad.com/. She said she learned it from her upline and so this really is a fairly new technique. I love the look, as she said, "It almost looks like counted cross stitch." In my case it's as close as I will ever come!

Below you will find a list of measurements and supplies needed to complete this card. I used snail to adhere the layers and to make the embedded image - I used snail to adhere the leaves, the butterfly and the flower pieces to the old olive layer and ran it through the Big Shot in the square lattice embossing folder. Then I adhered it to the rest of the card and added the pearl and added the sentiment with dimensionals.

The card is 4 1/4 x 11 - folded making a standard size card 4 1/4 x 5 1/2". I used it in the horizontal rotation.
Layer one is 4 x 5 1/4"
Layer two is 3 3/4 x 5"

Supplies:
Paper: Rose Red, Very Vanilla, Old Olive, Pear Pizzaz, So Saffron, Pretty in Pink, DSP for flower
Ink: Rich Razzleberry
Sizzlit: Little Leaves
Embosslit: Beautiful Wings
Die: Fun Flowers
Embossing Folder: Square Lattice
Big Shot
Punch: Scallop Oval, Oval Large
Jewels: Basic Pearls
Snail and Dimensionals

I hope you enjoy this new technique and give it a try. It's really quite easy and fun to make.

Have a great evening and see you tomorrow.

Saturday, January 29, 2011

Day 28 - Happy Birthday One Cupcake at a Time

This will be a quick post tonight - we had a very busy day at the Houston Marathon Expo and lunch with friends in from Chicago and Columbus. We ate at Jim Goode BBQ and got our fill of brisket and ribs, along with some jalapeno cheese bread and, of course, pecan pie!

All of this walking and eating left me tired, but when I arrived in my craft room to do today's project I had to take time to clean and organize. Making something everyday allows me to make quite a mess, so every couple of days I have to dig in and put everything back in it 's place. Once I had things in order I made a birthday card - using the Crazy for Cupcakes stamp set.

So let's get started with the card:

Measurements:
Card - 4 1/4 x 5 1/2
Marina Mist Layer - 4 x 5 1/4
Silver Layer - 3 5/8 x 5 1/8
Whisper White Layer - 3 1/8 x 4 5/8

I used the Stamp-a-ma-jig to line up my cupcakes and stamped them with Basic Black on Whisper White paper. I used markers to color in the cupcakes and a Silver Zig Painty for the plates. The sentiment was stamped with Pacific Point.

Supplies:
Paper: Mambo Melon, Marina Mist, Silver, Whisper White
Ink: Basic Black, Pacific Point
Markers: Melon Mambo, Daffodil Delight, Bashful Blue, Pirouette Pink, Pretty in Pink, Certainly Celery, Chocolate Chip, Baja Breeze, River Rock
Stamp Sets: Crazy for Cupcakes, Sweet Little Sentiments (Hostess Level 1 SS 2009)

Hope this encouraged you to pull out some stamps, some markers and create a card!

Friday, January 28, 2011

Day 27 - Thank You

Thank you is just what I need to say today. I've had a very quiet day, in fact, I can't remember such a lazy day. I've visited with friends on the phone, read some in my latest book Heaven and slept very, very late. What I did learn is that there's not much on TV during the day, at least not what I wanted to watch. Whatever happened to all of the craft programs that used to be on HGTV?

I did do some stamping and made two thank you cards. I had made a card like this a long time ago, in fact, I think we made it at club one month, but I changed up the colors and the buttons and had an all new look. This stamp set is so much fun, it's Punch Potpourri, Level 1 Hostess set. I punched out the butterflies and ran them through the Big Shot in the Petals-a-Plenty Embossing Folder.

All of the stamps in this set match punches, so there's no hand cutting. Gotta love that!

Hope you enjoy - it's early to bed for me - See you tomorrow.

Thursday, January 27, 2011

Day 26 - A challenge on it's own!

Day 26!

Today is a day that was filled with many blessings and some not such fun stuff.  To start with the blessings, I did the devotion for Early Time at my CBS (Community Bible Study) group.  

To tell this correctly I must back up - last Thursday I received that dreaded letter from the mammogram doctor - you know the one that says you need to come in for additional views.  So on Friday we got it scheduled for the following Wednesday. As a woman you know that this just simply fills us with dread.  On Saturday I saw an email from my leader that she desperately needed someone to do the devotion for the following week and so I said yes.  That's not something I would normally jump on, but this time I did and what a blessing - I was so busy in the Word preparing for my devotion that I didn't have much time to think about testing or what my body might be doing.  So yesterday I had the additional mammogram and ultra sound and they said they needed to do a needle biopsy and it was scheduled for(Thursday) this afternoon.  I came home from the test and guess what I had on my mind?  No it wasn't the biopsy it was the devotion.  God is so good and now you can see why I started this with today was filled with blessings etc. etc.

The second blessing was that I did the devotion without incident and it seemed to bless a number of the ladies, so I praise God for that. 

The third blessing was that two of my CBS sisters came to the hospital and prayed with me and waited for me to complete the biopsy and sat and relaxed and laughed with me after.  Once again I sa, "God is so good, no He's GREAT!"

Blessing four, my sweet husband took me out for dinner and oh yes, the not such great stuff was the biopsy but even that wasn't near as bad as I expected and my doctor and nurse were incredible.  So nice, patient, caring and efficient!  So even the not so good was still a blessing. (I will let you know the outcome next week when I have the results)

Now that you've experienced my entire day with me I am going to share a card I made this week.  I made one that I didn't post because I was sending it to a young friend and I didn't want her to see it here first.  Since I really don't feel like making something tonight I'm going to use it (I'm sure this doesn't break my challenge under these circumstances.)  I must admit it isn't a totally Stampin' Up card.  I used some baby paper and a baby foot stamp from a local store, but the rest of supplies were Stampin' Up including some retired paper, Pixie Pink, Whisper White cardstock, Whisper White 1/4" grosgrain ribbon and the scallop square punch, Congratulations and inside sentiment are Stampin' Up.  This is very unusual for me, but sometimes you just gotta do what you gotta do!  This card is congratulations on finding out it's a girl!  There will be more when the little princess is born!

So thanks for listening to my girl story and tomorrow I'll hopefully be back with a new card and a new post after a day of taking it easy!

Till then - happy stamping.

Wednesday, January 26, 2011

Day 25 - Because I Care

I've had an interesting few days and so I'm almost torn between continuing my 100 day challenge and having to say I need a break, but to stop seems just wrong so I'm going to try and keep on going.  And so, I think today's card sort of sums it up:  Because I Care

This is a very simple card,. I've been finding this challenge more and more difficult and I think it may be because I wasn't thinking about how great simple cards can me. This card may have been easy for me to make, but I think it would be a pleasant surprise to any friend who received it in their mail. 

The list of supplies for this card is short:  Because I Care stamp set, Watercolor paper along with Blushing Bride and Pear Pizzaz. I used Pear Pizzaz ink for the flower outline and sentiment.  Markers for coloring the flower are Certainly Celery, Blushing Bride and Bashful Blue. I used a distressing tool on the edge of the watercolor paper and sponged the edges.

Pull out your stamps and make an easy card.  You can make someone's day - it may be just what they need to lift their spirits.  There really isn't anything like a handmade card.

See you tomorrow!

Tuesday, January 25, 2011

Day 24 - Whimsical Words


A quick card made with vellum and the Manhattan Flower Embossing folder.  The card base is Poppy Parade, the sentiment is from Whimsical Words (retired) and is stamped with Cherry Cobbler.  The little bow is Real Red 1/8" Taffeta Ribbon.  

Don't forget Sale-a-Bration began today!  Earn a free stamp set with every $50 you spend through 3/31/11.

See you tomorrow.

Monday, January 24, 2011

Day 23 - Friend

Attention:  Tomorrow is the first day of Sale-a-Bration! This is one of Stampin' Up!'s biggest promotions and a favorite of customers and demos alike. All of us get a free stamp set for every $50 we spend between January 25 and March 31. Some of the stamp sets are unique to this promotion, but some are from the IBC - please let me know if you would like me to send you a brochure or check it out on line.  You can call, text or email and order or place one on my SU website.  One of the fun sets is Punch Bunch - I used the owl on my Who's 10 card a couple of days ago. 

Now for Day 23! Amazing to you, even more amazing to me!  Today was easy - I don't know why except that I knew I wanted to make a card for a special friend.  I love flowers and so does she - so a bouquet seemed the perfect idea. 

I love Poppy Parade and so that was an easy choice for one of the colors and Always Artichoke and Pear Pizzaz for the stems and leaves, so that was a natural for the card.  Confetti White was used for the background paper. 

The flowers were stamped with Awash with Flowers. I stamped the outline with Cherry Cobbler and the center with Poppy Parade on the card with the stems.  Then I stamped the center again  and cut them out mounted with them with dimensionals so they pop off the card.  

I cut the large oval with sizzix clear die (not SU) and the vase with the extra large oval punch.  I love how the vellum looks like frosted glass and lets the stems show through. I used some silver to edge the vase and give it some shape.

 Friend is from With All My Heart and I used markers so I could have two colors and punched it with the scallop oval. 

A fun and cheerful card - make one today and surprise a friend.

Happy Stamping.

Sunday, January 23, 2011

Day 22 - Fun Flowers Embossed

Today's card uses a variety of embossing folders and the newest die Fun Flowers to make a quick and easy but elegant card.

I cased this from Emma Fewkes, who cased it from still someone else. click here to see her beautiful inspiration.   I love how we share in the paper craft arena and with just a few tweaks it becomes your own.  I used Whisper White and Daffodil Delight as my color choices.  I used five different embossing folders and a sponge to add the hint of daffodil to the white cardstock.

The orginal card was hearts, so if you don't have the fun flowers die, try another as most any die or even punch could work - give it a try!  Case my case of her case - let's keep the case moving along.

Until tomorrow - Happy Stamping!


Saturday, January 22, 2011

Day 21 - Be My Valentine

Can you believe it?  I'm even surprised, but then why did I take the challenge if I didn't think I would or could do it?  Well, there's really is something about telling the world you're going to do something to keep you honest! I must say that now at the three week, 21 day post I really can't imagine not doing it.  Now, when it comes to making a different card etc. everyday, that's a little more difficult.  But even that is very stimulating and the one day I used a December card I was very disappointed in myself.  I'm going to try to make it to the 100 days with only items I'm currently making.

Do not be surprised, however, to find that some painting or sewing or something else begins to pop up as like many of you I love a lot of different mediums.  I would also love some comments.  They can be good or bad or just tell me what you're doing, but I would like to know someone is reading my blog!  This is sort of like radio, you just keep talking and have faith someone is listening.

For Day 21 I used the new Be My Valentine stamp.  This is a single stamp on the last page of the Mini Occasions Catalog.  I dressed it up with a few pearls from the jewels collection on pg. 188 of the 2010-11 IBC.  For a mere $4.95 you get 150 pearls - 50 each of three different sizes. 

I inked the size D clear block to make the Blushing Bride background behind the Valentine stamp - I love doing this because it gives an interesting background, solid but not, if you know what I mean.  Every time you stamp it will be different.  This works great with a solid stamp.

Supplies: All Stampin' Up except Corner Chomper

Paper: Cherry Cobbler, Blushing Bride, Whisper White
Ink: Blushing Bride, Cherry Cobbler
Ribbon:  Petty in Pink Taffeta
Basic Pearls Jewels
Clear Block (D)
Crop a  Dile Corner Chomper (Deco) (non SU item)

See you tomorrow!

Friday, January 21, 2011

Day 20 Birthday Wishes

Once again I've used Elements of Style.  This time it's with markers on watercolor paper and I really love the look and I enjoy the coloring.  I distressed the edges of the watercolor paper, and did a light rub with Pear Pizzaz on the edges.  A very simple, but very pretty birthday card.

Supplies:
Stamps: Occasional Quotes (Birthday Wishes), Elements of Style
Paper: Watercolor, Pear Pizzaz, Rose Red
Ribbon:  Certainly Celery Taffeta
Punches:  Oval and Scallop Oval
Markers: Rose Red, Pear Pizzaz, Pretty in Pink
Watercolor Pen

Now it's your turn - make a card, send a card, make someone smile!

Until tomorrow Happy Stampin:

Thursday, January 20, 2011

Thursday Break

I know I've committed to making something and posting everyday, but due to a very long and late Home Owners Assoc. meeting tonight I am posting, but I am posting something I made the end of December. 

This is a birthday card I made for a friend after seeing a fun button card.  I had to change it up significantly from the one I saw as I didn't have the stamp set, but I did have the buttons sizzlet.  I used a dark pink embroidery thread and adhered it to the back of each button with snail. I used dimensionals with some of the buttons to make the layers.  This was a fun card to make and you can use scraps for the buttons, all you need is the sizzlet and the Big Shot.

I do want to mention that there is a fabulous new button stamp set available in the new Mini Occasions catalog and a buttons embosslit. 

Again, I apologise for using a card from the end of December,but I did keep up the posting.  Maybe I'll try to make two things tomorrow - we'll see - stay tuned.

Happy Stamping,

Wednesday, January 19, 2011

Day 18 Birthday Owls

Tonight I made a card for a young friend of ours and used the new owl stamp out of the Sale-a-bration catalog Punch Bunch.  This cute little owl goes with the Two-Step Owl Punch and gives another alternative to punching out all of the individual pieces to make an owl.
I used the Timeless Type Sizzlet set to punch out the Who's 10 and U R (inside) and the Two-Step Bird Punch for the limbs.  This was a quick and easy card - and the owl stamp (and four others that match various punches can be yours for free when you spend $50 during the Sale-a-bration catalog period of 1/25 - 3/31.


Supplies:
Stamp:  Punch Bunch
Paper:  Melon Mambo, Whisper White, Chocolate Chip, Gold, Tempting Turq. (Retired)
Markers:  Various (you can choose)
Punch:  Two-Step Owl, Two-Step Bird
Sizzlets:  Timeless Type
Distressing Tool (cutter kit)
Big Shot

Until tomorrow - have fun - make a card  and make someone's day!

Tuesday, January 18, 2011

Day 17 - Flowers for a Friend

I must admit that tonight was tough!  The last few nights a design has come easy, but tonight I played for a long time before a card came forward that I wanted to make.  I wanted to use this stamp and started with watercolor paper, but it just didn't look the way I wanted so I switched to velum and used the stained glass technique.

I love this technique, but haven't used it in a long time - good to get back to some old favorites.


Supplies:
Stamps:  Elements of Style and Punch Bunch (sale-a-bration preview)
Paper: Pear Pizzaz, Blushing Bride, Whisper White, Vellum
Markers: Peach Parfait, Pretty in Pink, Regal Rose, Daffodil Delight, Pirouette Pink, Pear Pizzaz
Punch: 1" circle
Ink:  Pear Pizzaz, Craft Basic Black, Clear Embossing Powder

Pull out some paper and a favorite old stamp or technique and have fun.

See you tomorrow.

Monday, January 17, 2011

Day 16 - Awash With Flowers

Here I am "thinking of you" with my Day 16 creation and post!  

I hate to admit it, but this is the first time I've used this stamp set - Awash With Flowers arrived on the scene in July 2010 with the new catalog.  I actually didn't order it until a friend sent me a card using this set and I was sold  However, I'm just now using it, but I just bet it now will become a favorite.  .  This is a two-step stamp set, meaning you stamp the outlines of the flowers and the stems and then stamp the solid part of the flower over the lines.  They won't meet up exactly and that gives the look of watercolors.

I cased the card in the catalog (pg. 98) for this card tonight, changing layout, colors and sentiment, but the idea for cutting out the flowers and raising them up with dimensionals belongs to another creative soul and I say thanks.  Now it's your turn - have fun.
Supplies:
Paper, Blushing Bride, Whisper White and Chocolate Chip (Textured)
Stamps; Awash With Flowers and Bloomin' Beautiful (Retired)  A great new bee is available in Nature Walk in the new mini catalog.
Ribbon:  Pretty in Pink Taffeta
Punches: Oval and Scallop Oval
Markers:
Elegant Eggplant, Perfect Plum, Regal Rose, Melon Mambo, Rose Red, Pretty in Pink, Pumpkin Pie, Tangerine Tango Always Artichoke and Pear Pizzaz.  The bee is Craft Black with clear embossing powder and Delightful Daffodil.

After a cold rainy weekend this was a reminder that spring is just around the corner!

Happy Stampin'

Sunday, January 16, 2011

Day 15 - Sympanthy

Tonight's card was a sad but easy choice as I needed a sympathy card.  A new friend passed away this week.  She was one of the first people I spoke to in our new community and the secretary for our HOA.  She will be greatly missed by our entire community and I wanted a card for her husband and family.

One of my favorite sets for sympathy cards is Thoughts and Prayers.  This is such a versatile set and is a simple kind of elegance.  I use two embossing folders to make the back ground.  This is one piece of paper with each half embossed in a different folder.  I placed a thin strip of the background color across the seam line.  I think this is a fun way to make interesting backgrounds.

Supplies:
Stamp:  Thoughts & Prayers
Paper:  Soft Suede, Crumb Cake and Whisper White
Ink: Soft Suede
Markers: Pear Pizzaz, Early Expresso
Embossing Folders: Square Lattice, Vintage Wallpaper
Tools:  Distressing Tool , Sponge, Snail, Dimensionals

See you tomorrow,

Happy Stamping

Saturday, January 15, 2011

Day 14 - Journal

Today, I decided to make a journal for a friend for her birthday.  I recently got a Cinch and so I was able to make this from scratch; however, rather than use the wires I used ribbons.   I also used retired paper, Walk in the Park.  This retired several years ago, but sometimes we just have to pull out paper and use it.  Doesn't do any good to keep it in a closet! 

I glued the paper to the chipboard and then punched the holes.  I cut Very Vanilla paper 5x7.5 to fit in the cover and punched the holes.  I used a variety of 1/4" grosgrain ribbon to make the ties.


I love the way the book looks on the inside with the ribbons .


So, my plan is to put some flowers or other embellishments on the front, but as I was clipping ribbon I snipped my finger and so it was all I could do to finish the ribbons today.  I still think it counts as my craft of the day!  I'll take more pictures when it's complete.
Go through your old papers, embellishments and make something fun today, well as late as this is tomorrow would be a better idea! 

See you tomorrow!

Friday, January 14, 2011

Day 13! Take a spin for your birthday!

Good Morning (CST) - Can't believe I'm posting before 11 PM - What a great day to craft a card! So thankful to be able to start my day stamping!

This is a brand new set from Stampin' Up! It's in the new Mini Occasions catalog (pg. 10) and it is fun and so very versatile.  It comes as a two box set for $20.95. The spinner hands are sold separately for a very reasonable $3.95 for a set of 12. 


Now for my card - I have a sweet young friend who is like a daughter to me - her mom was one of my best friends and when she passed away a few years ago I grabbed Kim as my own!  She is very special and full of life and fun so I thought she would enjoy this card.  I know I would love for someone to suggest I eat cake!  I hope it lands back on this when she takes a spin, but all of them are fun suggestions so you really can't go wrong.


Next I had to decorate the inside - it's hard to stamp on black, so I layered the inside too and used stamps from three more sets.  All of the supplies will be listed at the end.  Note this is a 5" square card.


The inside is stamped with a great cake to carry on the "eat a piece of cake" theme from the front and reminds her that this is no day to eat just a sliver!

Now for the supplies:

Stamps:  Take a Spin
              Birthday Bakery
              On Your Birthday
              Happy Moments
Paper:    Basic Black
              Melon Mambo
             Whisper White
Ink:       Melon Mambo
             Basic Black
Embellishments:   Game Spinner Hands
Markers:   Melon Mambo
                 Pirouette Pink
                 Daffodil Yellow
                 Silver Pen for cake plate (not SU)

Hope you enjoyed - see you tomorrow for Day 14!                           

Thursday, January 13, 2011

Day 12 of 100 Blossoms Abound

Blossoms are back one more time!  This time I used the smaller petal and have a totally different flower.  For this flower I only used the Blossom Petal Punch and didn't use the stamp set.  These two are so versatile and I know I will be using them often; however, when I cleaned up tonight I put both away and am determined to use some other new old and new stamps for the next few days.

But now for today's card: 
I punched out the petals and used snail to attach them to the card and used a button for it's center.  I stamped the Hello, punched it out and ran it through the Big Shot with the polka dot embossing folder.  I sponged Pear Pizzaz on the edges and the center of each petal before adhering to the card.  This was very fast fun card to make - you really must add this versatile puncxh to your list of must haves from the new Mini Occasions catalog.

Supplies:

Paper:  Always Artichoke, Pear Pizzaz, Whisper White
Ink:  Pear Pizzaz
Ribbon: Old Olive 5/8" satin, Natural Hemp twine
Button:  Subtles (Certainly Celery)
Embossing Folder: Perfect Polka Dots
Stamps: Fundamental Phrases
Punch: Blossom Petal and Butterfly
Pop up glue dot, Snail, Sponge Dauber

Hope you enjoyed - pull out a punch or some stamps and make a card! 

See you tomorrow -

Wednesday, January 12, 2011

Day 11 - Blossoms Return

Welcome to day 11 in my 100 day challenge!  I'm finding this to be great fun, although I know there will be some tough times ahead when I'm trying to think of a new design and my mind is blank.  But today it was full of blossoms.  This is probably a desire for Spring to appear and send this cold weather packing!

Once again I pulled out my new Build a Blossom stamp set and Blossom Petals Punch to make two birthday cards.  Both cards I made today are most alike except for paper and ink colors so I will  show both cards and give complete supplies for the first card and just list color differences for the second.  So let's see these blossoms -

Supplies:
Paper:  Regal Rose, Pear Pizzaz, Whisper White
Ink:  Regal Rose, Pretty in Pink, Pear Pizzaz
Stamps: Build a Blossom and Vintage Labels (retired)
Button: Subtles (Certainly Celery)
Punch: Blossom Petals Punch and Medium Punch (Holiday Mini)
Ribbon: Pretty in Pink 3/8" taffeta

This is a 5" square card (5 x10" scored at 5"), Regal rose layer is
4 5/8" square, and whisper white is 4 1/4" square.

Petals and leaves were adhered with snail, with dimensionals under the top layer of petals only. 


Paper:  Pear Pizzaz, Melon Mambo, Whisper White
Ink: Rich Regal, Melon Mambo, Pear Pizzaz
Button:  Subtles (Pretty in Pink)

Rest of card instructions are the same as first card.

These are both birthday cards, but they could be changed to most any sentiment.  I really love this new set - you will be seeing much more in the next few days - 89 to be exact!


Until tomorrow - happy stamping!

Tuesday, January 11, 2011

Day 10 - Black and White

Day 10!  Wow, who would have ever thought I would actually post 10 consecutive days.  Well, I have and it's a challenge, but it's also keeping me in my craft room and stimulating my creativity.

Today I made some small Valentine treat bags.  I must admit that the paper isn't Stampin' Up it's actually Christmas paper that I bought the day after Christmas.  The moment I saw it I saw crafting with it.  Actually black and white would never be my choice for Christmas, but it had crafting written all over it!  I love how they turned out and I hope you enjoy them too.

For the first bag I used the scallop bag die to make the bag and then cut a separate piece of Whisper White cardstock to fit the front of the bag.  I punched out a heart using the movers and shapers heart die and sponged the edges with real red ink.  I used the Scalloped Heart of Hearts embosslit for the red heart, tied a ribbon on it with the new Whisper White 1/8" taffeta ribbon and put some chocolate treats inside!  Treat bag complete.

For the second bag I used the same paper and die, but only added a white scallop on the front to add some interest.  This was punched with the 1 3/4" scallop circle punch and Whisper White cardstock.  I added some kisses and tied a ribbon with the 3/8"  taffeta ribbon.

Now after I was all ready to post these fun little bags, I discovered this die has retired.  I didn't realize that when I started the project, but since I've made a commitment to create and post each day I had to keep on going.  I hope for those of you who also own this die you will enjoy the inspiration.  For those of you who don't, we have several similar dies for making great Valentine treat bags and boxes.  Of course, I normally would use Stampin' Up cardstock, but these are treat bags that aren't meant to last a life time, so I had fun with this funky paper.  Don't be afraid to experiment - just as long as you are sure you use acid free paper for any treasures you plan to keep, especially scrapbooks.

Well, I don't know what I'll have for you tomorrow, but I will have fun planning and making something and you will be surprised when it appears. Until tomorrow - happy crafting.

Related Posts Plugin for WordPress, Blogger...